
Friday, January 25, 2008
In this episode I will explain to you "how to make your blog more expressive with smile icon" without copy an image and put to your blog, but with only little code and then it will be smile icon image automatically. For example, if you type this code :) it will atomatically change to this image  , this code :p will be like this
 and etc. Do you interest? if no, go from my blog
here's the trick:
1. Login to blogger then chose "layout --> Edit HTML"
2. Find this code ]]></b:skin>, if you found it then put the code below under it.
<script src='http://www.geocities.com/kendhin_x/blog/smile/smile.js
' type='text/javascript'/>
3. Save your editing.
* Before you type the code you have to press "space" first"
here is the code to show smile icon
:) -->
:( --> 
:p -->
:D -->
:$ --> 
;) --> 
:@ --> 
:# --> 
:k --> 
:x --> 
:o --> 
:O --> 
:L --> 
:r --> 
:s --> 
:y --> 
:~ --> 
:v --> 
:f --> 
:d --> 
:c --> 
:z --> 
Sunday, January 20, 2008
You have to create one first. You can create a favicon in an icon editor software or generate one online. One useful free program to create it in is IconEdit32. Search for it in Google and download and install it. It can create 16x16 icons and 32x32 icons. The first is very small and so it is better to create one of the latter size.
A Favicon is actually short for "Favourite Icon" and serves as a sort of symbol for the site. You can have a text Favicon made up of the first letters of your site or a symbolic favicon which denotes the subject of your site. It also serves to markout your site in your bookmark list. You can also make an animated favicon and a scrolling favicon which scrolls your blog title one letter at a time.
To make one online a free favicon generator is available at :
http://www.html-kit.com/favicon/
After downloading the favicon to your PC upload the icon file to a freeserver like Googlepages. Copy down the URL of the icon at Googlepages. Then login to Dashboard of your blog and go to Edit Html subtab under the Template tab. Copy the following code just below <title>...</title> tags
<link rel="shortcut icon" href="URL OF YOUR ICON AT GOOGLEPAGES" />
Save Template. Republish if necessary. Refresh Cache and view blog.
If you want to add an animated favicon add the following code in the same position :
<link rel="shortcut icon" href="URL OF YOUR ICON AT GOOGLEPAGES" />
<link rel="icon" href="URL OF YOUR ICON AT GOOGLEPAGES" type="image/gif" />
Save Template.
Another site to make a favicon is :
My Favatar
Here is a New Way of Showing Archive!
A calendar archive widget :D
Just click the image to view a working example & get the instructions.

Here is 13 more built in bookmarkers you can use on your blogger / blogspot blog. There are Furl.net, ma.gnolia.com, blinkbits.com, meneame.net, simpy.com, myweb2.search.yahoo.com, digg.com, del.icio.us, ocio.fresqui.com, reddit.com, blinklist.com, netvouz.com, and of course technorati.com
here is the demo:


I have created 2 different version of this trick for you. that is the one for bookmarkers inside your post, and the another one is bookmarkers for outside of your post.on the download zip below, you will find 2 separated files, there are
- blogger-bookmark-inside-post.txt
- blogger-bookmark-outside-post.txt
What is the different?
1. blogger-bookmark-inside-post.txt is only applicable inside of a post widgets. while the blogger-bookmark-outside-post.txt is applicable anywhere.
so the outside-post is better then the inside post? well it depends. the outside codes will grabs the current link, and the current title of the browser. What does that means? It means, on default configuration, the title would be something like this: Your Blog Title Here : Then Your Post Title Here.
While on the inside code, it will just Your Post Title Here.
Are you confuse now? Good. then just download this codes below, and try it your self, so you’ll understand. Don’t forget to backup your template first. thanks!
[via Jack Book]This tutorial will show you how to add ratings on your blog. not just blogger, wordpress, typepad, movable type but any kind of HTML file as long it’s able to embed Javascript inside the code. you can see the demo first here. or view the screenshot below.

How to implement it on blogger/blogspot?
here are the steps;
1. Go to your template editor under your dashboard. Tick the “Expand Widget Template”
2. Find this code
<data:post.body/>
3. Put the codes below right after that line above (or download it here),
<script language='JavaScript'>
var OutbrainPermaLink='<data:post.url/>';
var OB_demoMode = false;
var OB_Script = true;
</script>
<script src='http://widgets.outbrain.com/OutbrainRater.js' type='text/javascript'/>
4. Save your template, and done!
Please be creative. you can move the code as long it still inside the include=’post’ under the blog widget.
How to Implement this to Wordpress
Do you want to put this ratings on the post page only? or to your homepage and custom page too?
well, basically it’s all have the same steps. if you want to put this on your homepage, then you have to install this codes on your index.php file. if you want to install this on custome page, go to your page.php file. and if you want to install this code on your post page, go to single.php file.
Now, here is the steps.
1. Go to your Theme Editor.
2. Click on the Single or Index or Page on the file list on right.
3. Find this code below,
<?php the_content(�Read the rest of this entry »�); ?>
4. Put the codes below right after that line above (or download it here),
<script language='JavaScript'>
var OutbrainPermaLink='<?php the_permalink() ?>';
var OB_demoMode = false;
var OB_Script = true;
</script>
<script src='http://widgets.outbrain.com/OutbrainRater.js' type='text/javascript'/>
5. Save your theme. and done.
Notes: this services is provided by outbrain.
How to Add a Digg Button to Blogger Posts-Blogger Hack
0 comments Posted by Ehtisham Khan at 2:36 AMThis post is for my fellow friends who asking for digg button display in their post. Digg button will show up on every single post you have in your blog.
1. STEP
Go to your blog template> Edit HTML> expand the widgets> and check for this line:
<p><data:post.body/></p>
2. STEP
replace with this code:
<p>
<!-- DIGG -->
<div style='float:right; margin-left:10px;'>
<script type='text/javascript'>
digg_url = '<data:post.url/>';
</script>
<script src='http://digg.com/tools/diggthis.js' type='text/javascript'/>
</div>
<data:post.body/>
</p>
3. STEP
Click on Save Template. Done!
So do you love this digg button? lol
Widgetizing your Blog is the new thing to explore here on Blogger TTT. Ramani shows how to add random Einstein quotes to your Blog. Phydeaux3 started all this showing Flickr Puppies, and even Hoctro now shows a Flickr Zeitgeist widget. So it is time that Beautiful Beta follows these fellows, with a useful Weather Forecast Widget. And ofcourse a tutorial on how to create this widget on your own Blog and make it easy-to-install for your readers.
You have to follow 3 easy steps:
Step 1: Create the Widget
Go to WeatherReports.com, scroll down and click Add WeatherReports To Your Site.
In the next screen, enter your city, select the colors and style of the weatherbox. After entering all your selections, you will go to the next screen automatically. Take a look at the preview, and select and copy the HTML-code.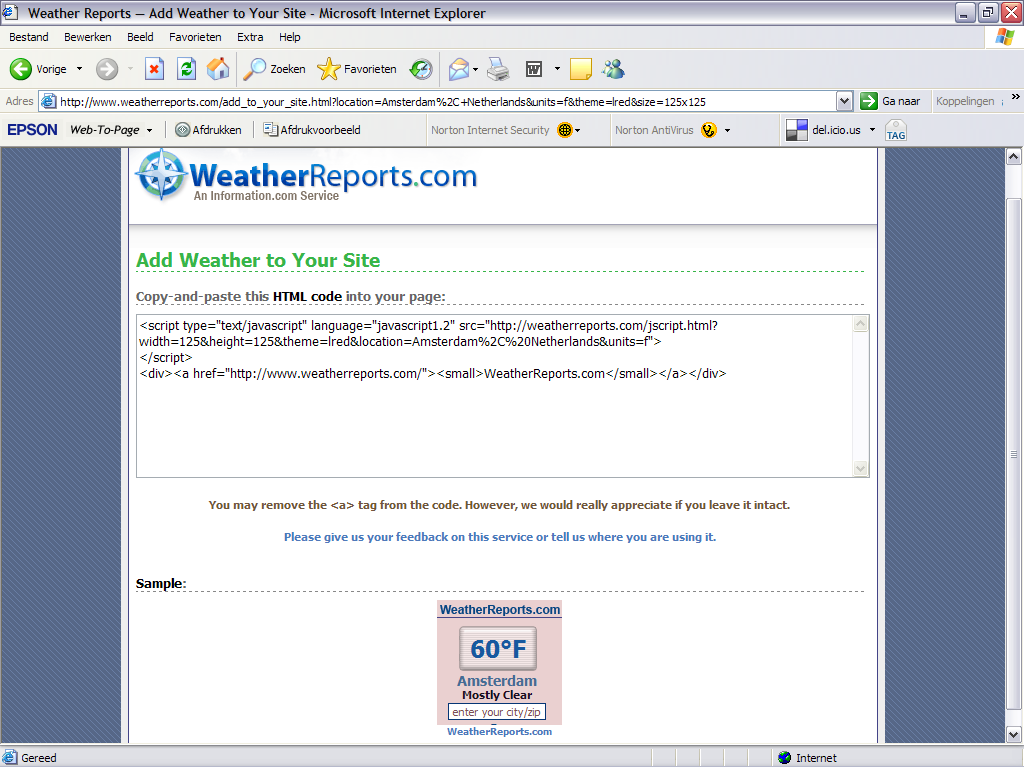
Step 2: Add the Widget to your Blog
Add an new HTML page element to the sidebar of your Blog. Paste the code that you copied into the page element, and set its title to "Weather Report".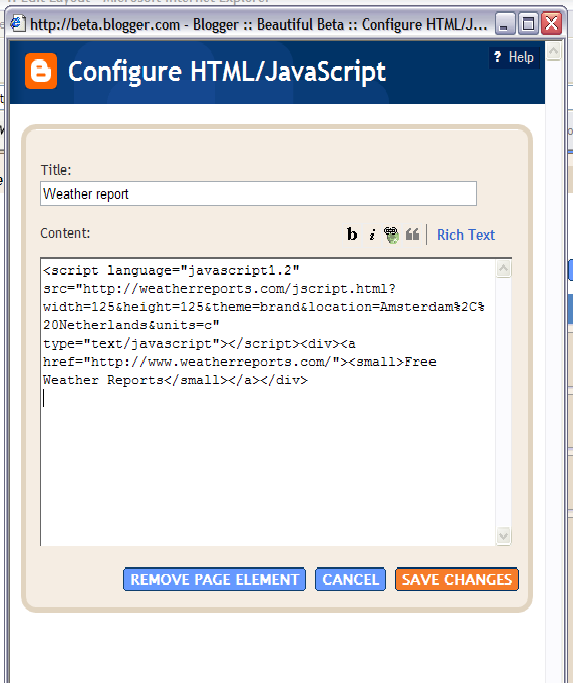
Don't save it yet, but go to step 3.
Step 3: Add an Install-button
Now we are going to add a button, that installs the widget on your visitors blog when it is clicked. In fact, we'll add a form with several input fields, but only the button will be visible. Here we go.
<form action="http://beta.blogger.com/add-widget" method="post">
<input value="Weather Report" name="widget.title" type="hidden"/>
<textarea style="display:none;" name="widget.content">
<script type="text/javascript" language="javascript1.2" src="http://weatherreports.com/jscript.html?width=125&height=125&theme=brand&location=Amsterdam%2C%20Netherlands&units=c"></script><div><a href="http://www.weatherreports.com/"><small>Free Weather Reports</small></a></div>
</textarea>
<input value="Install to Blog" name="go" type="submit"/>
</form>
The text between the <textarea>-tags is the html of your widget. Please notice that each <> is replaced with >.
Now save the page element and view your Blog.
If you want more information on how to add third-party widgets to your blog, take a look at these help pages.
How to Install Invisible Music Player-Widget For Blogger
0 comments Posted by Ehtisham Khan at 2:35 AMI don't recommend this, but there are bloggers who want it, so I will describe how first and explain why I advice against it later.
How to install an invisible music player to your blog
Once you have uploaded the music file to the web, get its URL.
Sign into blogger.com (Dashboard) and you will see a list of blogs you have created. Of course if you only have created one blog, you will see only one. Whatever it is, click LAYOUT and in any section, I recommend the footer, click "Add a Page Element", and in the "pop-up", select HTML/Javascript, then add this script into the HTML/Javascript box:
The attribute loop="true" play continuously. If you want it to play only once, you will have to change it to loop="false".
[UPDATE]
Why I don't advice adding music that automatically start to a blog or any other websites
When you install an invisible music player, that means there will be no button to click to start the music. Therefore you must make the music play automatically for it to make any sense. That is why there is the attribute autostart="true" in the script.A surfer may visit your site in the middle of the night while others are sleeping, or with a sleeping baby beside him or her, or in a public library, or he or she may already have his or her favorite music playing in the background. Once your music start, the visitor may be forced to quickly surf away from your site to stop the music and you lose a visitor. And if a surfer has already his or her favorite music playing, your music will replace that, and that may cause irritation. There will be no button anywhere for the visitor to click to stop the music.
Still want to install an invisible music player. Well, everyone have their own preferences and opinions and what they think is good or no good. The choice is yours.
Here is the method to do it
Goto your Blogger Template>Edit Html and back up your Template by downloading it..
Now In the Template code find
you will notice some variable defenitions and some style defenitions below it
copy all the data below the above code till
and save the copied text as a text file on your desktop.
Now in the text file you will see codes like
<Variable name="sidebarTitleBgColor" description="Sidebar Title Background Color"
type="color" default="#ffd595" value="#eed595">
This means that the variable "sidebarTitleBgColor" by default has the value #ffd595 and now you are using the value #eed595
To use theme switcher you will have to replace each occurance of this variable by its value in the text file..
That is you should replace all occurances of $sidebarTitleBgColor with #eed595
Similarly all the variables(like $borderColor,$Sidebartextcolor $mainBgColoretc..) should be replaced by their values.
Now consider the declaration of the font variables
<Variable name="bodyFont" description="Text Font"
type="font" default="normal normal 100% Verdana, Arial, Sans-serif;" value="normal normal 100% Verdana, Arial, Sans-serif;">
Here the $bodyFont variable should be replaced by normal normal 100% Verdana, Arial, Sans-serif;
Similarly all variables should be replaced by the text enclosed in its corresponding value="........" declaration..
Now remove all the variable defenitions from the text file..
Variable defenitions will look like this
/* Variable definitions
====================
========Defenitions here====================
*/
So delete every thing between /* and */
Now your default style sheet is ready.Save this test file as default.css
Now make another style sheet and save it as custom.css.The great thing about this script is that you don't have to make a completely new stylesheet. You only have to define those rules that are different from the default stylesheet (although you can include all the options that are the same too if you want).
Similarly you can make as many style sheets as you want (say custom2.css,custom3.css etc).
Now upload all of your stylesheets somewhere(maybe google pages).
Now in your Blogger Template>Edit Html delete everything below the variable defenitions and above
Now just below find the following code
</head>
and replace it with
<script src='http://simpletricksblog.googlepages.com/styleswitch.js' type='text/javascript'/>
</script>
<link href='url of default.css' rel='stylesheet' type='text/css'/>
<link href='url of custom.css' media='screen' rel='alternate stylesheet' title='custom-theme-1' type='text/css'/>
<script type='text/javascript'>
window.onload=function(){
var formref=document.getElementById("switchform");
indicateSelected(formref.choice);
}
</script>
</head>
(Dont Forget to replace url of default.css and custom.css with its actual urls.)
Now some where in the sidebar add the Theme switcher Button code below.
<input value="none" name="choice" onclick="chooseStyle(this.value, 60)" type="radio"/>Default Theme<br/>
<input value="custom-theme-1" name="choice" onclick="chooseStyle(this.value, 60)" type="radio"/>Custom Theme 1
</form>
To add more themes you should add similar link href= tags for each of your stylesheet and add the button code for each of them..
The awesome javascript for this hack was developed by Dynamic Drive.
If you have any doubts feel free to contact me or comment here..
 (Click image for Clean Priview)
Did you Notice The Picture Above?
Now you Blogger / blogspot users can have a comment form under your post. this mean your readers can leave and write a comment exactly under your post. without clicking and open a new page / window.
How to Do That?Sooo Easy:-
1. This is a free service from haloscan.com, so what you need to do is just register for a new account on haloscan.com, and about seconds, you’re registered.
2. Login to haloscan
3. Click the SubMenu “Install”
4. Choose your blog type, and because we’re talking about blogger, so blogger it is.
5. Click Next and follow the instructions.
6. Done, and congratulation
With this haloscan free services, we can have a better great comment system on our blogger / blogspot blog.
there are many great points about this services.
1. We can easily integrate it with cocoment.com service, so you can track your comments
2. You can customize the header of your comment from
3. it’s free. that’s the most important
so what are you waiting for?
I think You Have Noticed This Comment Form in My Blog!
Have an easy way to leave a comment Quickly!
Blogger announced that they support blog feeds in JSON format also. Soon, Hoctro found some sample code to use these JSON feeds and used it to come up with a recent posts/comments widget of his own. I realized that it is now possible to customize the recent comments widget further to anyone's needs.Using this method, we can only show very few words of the comment (too few to comprehend) and upto 5 comments only. I have developed a widget that allows the blog author to customize both these. You can see the new widget in my sidebar, showing entire comment mostly and significant portion of the comment in some cases.
With this widget,
1. You can specify how many comments you want to display in your blog (defaults to 10)
2. You can specify the maximum number of letters that should be displayed in each comment (defaults to 100).
Here is how you add this widget to your blog.
Step 1: Goto Template->Edit HTML tab. Find the tag in your template and add all the code from this page before it and save the template.
Step 2: Goto Template->Page elements tab and click on "Add a page element" in your sidebar. Choose HTML/Javascript element. Give an appropriate title and copy/paste this code.
<br/><script language="javascript">
var numcomments = 10;
var numchars = 100;
</script>
<script src="http://yourblog.blogspot.com/feeds/comments/default?
alt=json-in-script&callback=commentDisplay"></script>
You need to change the blog URL to yours. You could also change the number of comments/letters per comment to whatever fits your blog. Then, save the changes and move the widget to wherever you want. There, you have a customized recent comments widget!!
For those who are interested in the details, I am displaying the content of each entry in the comment feed instead of the title (after removing all the html tags). I display only the number of characters as specified and also control the number of entries displayed. All this is done in the callback function to which the JSON object is passed.
After some searching for a "Popular Posts" widget for Blogger, I discovered AffiliateBrand's widget. This widget is free to use, and displays your most popular posts based on tracking of page impressions.
The default widget provided by AffiliateBrand looks something like this: 
The widget is very simple to install, and now you don't even need to sign up to AffiliateBrand membership to be able to use it! You will need to register your blog's address though, in order to ensure that your most popular posts are tracked. Here's how to get this widget for your own blog:
- Visit AffiliateBrand.com
 and click on "Blog Window-Create/Edit" in the left sidebar.
 - Add your blog URL into the box provided, and click "Add Blog". Your blog's URL will then appear in the window beneath.
- In order to get the javascript code you need to create your widget, you will need to click on the "edit" link beside your blog's URL. You will then be directed to the page from which you can copy the code. Paste this into Notepad or something similar.
- It may be a good idea to configure the width and height of the widget before you install it into your blog's template (if you decide to register with AffiliateBrand, you can do this later). To do this, click on "Customize" and choose your specifications for the widget's width, height, how many posts to display, etc. You can also specify a stylesheet for the widget, which I shall explain later. Then click "Save changes.
- Now, go to Template>Layout and add a new HTML/Javascript element to your sidebar. Paste the javascript code from AffiliateBrand and save your widget. Now when you view your blog, you will see the "popular posts" widget appear in your sidebar. At first, it will display a message rather than any posts as it takes a short time to begin collecting data of your most popular posts. To speed this up, click on a few of your post pages and you should soon see the results begin to appear.
As mentioned, if you create an AffiliateBrand account, you will easily be able to edit your widget later, as the javascript code is dynamically updated from the remote server. Also, you will be able to receive detailed analytics reports of your blog activity.
If you prefer, you can also specify a style-sheet to alter the appearance of your widget, which is explained most fully in the Stylesheet FAQ.
Another advantage of using this widget is that you can associate your Amazon Associated publisher ID and display relevant ads beneath your widget to help you earn money from your blog. To do this, click on "edit" beside your blog's URL, and then on "Advertising". On the following page, you should enter your Amazon Associates ID.
For a great tutorial of how you could customise this widget to better suit your blog's style, take a look at this post by Webweaver, which offers excellent advice.
As yet, I'm still learning about the configuration and usability of this widget, and will probably post again in a couple of days regarding my customisations and experience. In the meantime, feel free to leave your comments and opinions or email me if you prefer.
The job is done. We now have a complete interactive Table Of Contents. Click the button in my sidebar(TECHNOLOGY HUNT) to display the TOC. You can sort the TOC by Post Title by clicking the column header. Click it again, and it is sorted in reversed order. The same way if you want to sort the posts by date: newest first, or oldest first. And by clicking on one of the labels in the TOC filters all posts with that label. Click the column header to return to the full ToC.
Here is how to install it to your Blog.
Step 1: Back Up your Template.
Step 2: Add a HTML Page Element
Edit your template in HTML-mode, and look for the
Change that line as follows:
<b:section class='main' id='main' maxwidgets='2' showaddelement='yes'>
Add a HTML page element above your Blog Posts element.
Leave the title blank. Add the following html:
<div id="toc"></div>
Save your template.
Step 3: Add a Sidebar HTML-element
Now add a HTML-element to the sidebar. Set the title to "TOC".
For the contents, enter:
<div id="toclink"><a href="javascript:showToc();">Show TOC</a><br/><br/></div>
<script style="text/javascript" src="http://home.planet.nl/~hansoosting/downloads/blogtoc.js"></script>
<script src="http://YOURBLOG.blogspot.com/feeds/posts/default?alt=json-in-script&max-results=
999&callback=loadtoc"></script>
Replace YOURBLOG with the name of ...... exactly.
Oh yes, and save.
Step 4: Add custom styles to the skin of your template.
New id's and classes are:
#toc : the div-wrapper that contains the TOC
.toc-header-col1 : header of column 1
.toc-header-col2 : header of column 2
.toc-header-col3 : header of column 3
.toc-entry-col1 : cell in column 1
.toc-entry-col2 : cell in column 2
.toc-entry-col3 : cell in column 3
For your convenience: TECHNOLOGY HUNT uses the following styling:
<style type="text/css">
#toc {
border: 0px solid #000000;
background: #ffffff;
padding: 5px;
width:500px;
margin-top:10px;
}
.toc-header-col1, .toc-header-col2, .toc-header-col3 {
background: #ffd595;
color: #000000;
padding-left: 5px;
width:250px;
}
.toc-header-col2 {
width:75px;
}
.toc-header-col3 {
width:125px;
}
.toc-header-col1 a:link, .toc-header-col1 a:visited, .toc-header-col2 a:link, .toc-header-col2 a:visited, .toc-header-col3 a:link, .toc-header-col3 a:visited {
font-size:80%;
text-decoration:none;
}
.toc-header-col1 a:hover, .toc-header-col2 a:hover, .toc-header-col3 a:hover {
font-size:80%;
text-decoration:underline;
}
.toc-entry-col1, .toc-entry-col2, .toc-entry-col3 {
padding-left: 5px;
font-size:70%;
}
</style>
You can add this to the <b:skin>
Enjoy!
What's you first reaction when you land on a website that's written in Russian, Chinese or Japanese ? Most of us would hunt for that English language translation flag and if that's missing, we will copy-paste the site address in Google Translate website or Yahoo Babelfish to convert the site content to English.
Way too much effort. Now let's reverse the roles and say somebody from China or Japan visits your blog (written in English). The foreign visitor will have exactly the same problems that you faced when you were visiting that non-English website above.
Since more than 65% of web users speak a language other than English, it is essential that you provide language translation features in your blog so that you don't miss the non-English speaking traffic.
So when an Arabic visitor passes your English blog, he or she can just click the Arab flag to translate the website into his native language - That way you don't loose a visitor plus he could even subscribe if the content is good even if written in another language.
Here's a quick tutorial to add language translation to your blog. You can be any blogging platform including Blogger, Typepad, Wordpress that provides access to templates. The visitor will see nine country flags corresponding to German, Chinese, Japanese, Korean, Arabic, French, Portuguese, Spanish and Italian languages.
<script language="JavaScript">
<!--
document.write ("<input name=u value="+location.href+" type=hidden>")
// -->
</script>
<input name="hl" value="en" type="hidden">
<input name="ie" value="UTF8" type="hidden">
<input name="langpair" value="" type="hidden">
<input name="langpair" value="en|fr" title="French" src= "http://photos1.blogger.com/img/43/1633/320/13539949_e76af75976.jpg" onclick="this.form.langpair.value=this.value" height="20" type="image" width="30">
<input name="langpair" value="en|de" title="German" src= "http://photos1.blogger.com/img/43/1633/320/13539933_041ca1eda2.jpg" onclick="this.form.langpair.value=this.value" height="20" type="image" width="30">
<input name="langpair" value="en|it" title="Italian" src= "http://photos1.blogger.com/img/43/1633/320/13539953_0384ccecf9.jpg" onclick="this.form.langpair.value=this.value" height="20" type="image" width="30">
<input name="langpair" value="en|pt" title="Portuguese" src= "http://photos1.blogger.com/img/43/1633/320/13539966_0d09b410b5.jpg" onclick="this.form.langpair.value=this.value" height="20" type="image" width="30">
<input name="langpair" value="en|es" title="Spanish" src= "http://photos1.blogger.com/img/43/1633/320/13539946_2fabed0dbf.jpg" onclick="this.form.langpair.value=this.value" height="20" type="image" width="30">
<input name="langpair" value="en|ja" title="Japanese" src= "http://photos1.blogger.com/img/43/1633/320/13539955_925e6683c8.jpg" onclick="this.form.langpair.value=this.value" height="20" type="image" width="30">
<input name="langpair" value="en|ko" title="Korean" src= "http://photos1.blogger.com/img/43/1633/320/13539958_3c3b482c95.jpg" onclick="this.form.langpair.value=this.value" height="20" type="image" width="30">
<input name="langpair" value="en|zh-CN" title="Chinese Simplified" src= "http://photos1.blogger.com/img/43/1633/320/14324441_5ca5ce3423.jpg" onclick="this.form.langpair.value=this.value" height="20" type="image" width="30">
<input name="langpair2" value="en|ar" title="Arabic" src= "http://photos1.blogger.com/blogger/3709/485/1600/arabic-flag.gif" onclick="this.form.langpair.value=this.value" height="20" type="image" width="30" />
</form>
Though the machine translation powered by Systran is generally not as correct as the service offered by professional translators, not all of us can afford an human powered translation. Plus the non-English visitor can alway connect the dots and make some meaningful sense of your content.
There's no translation support for Urdu, Russian, Hindi, Telugu or other Indian languages.


